Passcode requirement is 8 characters, 1 letter, 1 number, and 1 special character.
1. Confirm APIs have been enabled and create an API key
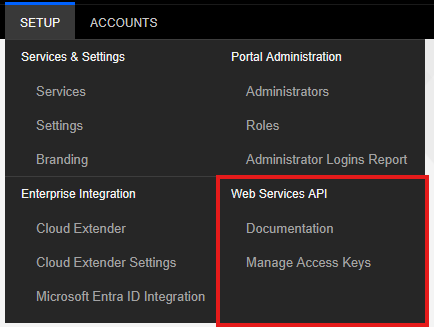
Open MaaS360 and navigate to Setup > Web Services API > Documentation.
If there are is no Web Services API, please follow these steps to enable it.
Go to the MaaS360 Portal and go Setup > Portal Administration > Roles
Click Add Role.
Select Create new and click next
Select the <Web Service – Access Keys> right to access.
Select add role.
Assign this role to your account.
Once enabled, go into Setup > Web Services API > Manage Access Keys.
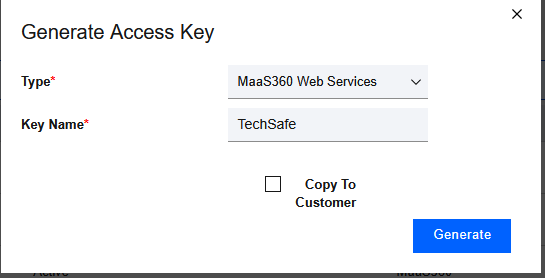
Click Generate Access Key in the top right Ensure Type is “MaaS360 enabled web services” and give it a name.
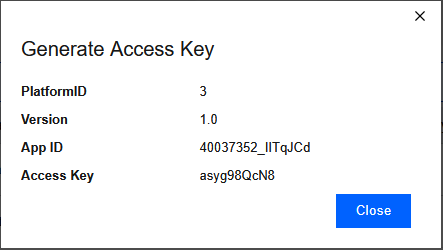
Take note of the PlatformID, Version, App ID, and Access key. You will be prompted in the on-boarding process to enter these.
2. Create a script only user
Open MaaS360 and navigate to setup > Administrators.
Click Add Administrator.
Enter an email address to be used for notifications and password resets.
For username, it’s recommended to use your customer name with SO to identify it’s a script-only user, e.g., TechSafe_SO.
Click Next.
For full functionality, like passcode reset, wipe, hide device, and more, select the Administrator permission.
If you want a read-only view with no device actions, please apply the Read-only permission.
Please note, if you apply one permission and then wish to switch, you will need to create a new administrator, apply the permission, and set it as script only.
Click Next.
You should receive an email with instructions to setup the account. Follow those until you reach the homepage.
Once the account is set up, log out and log back in as your normal administrator account.
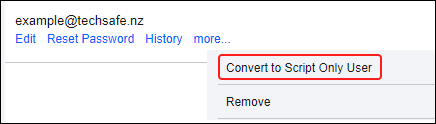
Navigate to Setup > Administrators.
Hover over More under the account you created and select Convert to Script Only.
This account will no longer be able to be logged into and can only be used to make API calls.
3. Enter Details Into TechSafe
Open your TechSafe Portal and click Edit options under Account Management.
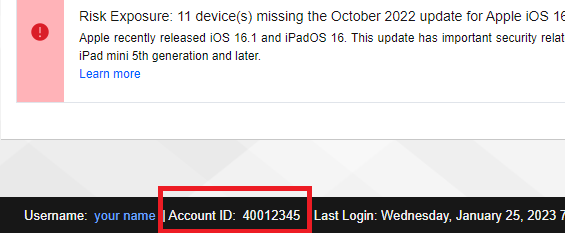
Enter your MaaS360 instance ID. This can be found found at the bottom of the MaaS360 portal.
Enter the domain users will be registering under.
Enter the name of the API account you just created.
Click Reset Password and enter the password for the account you created.
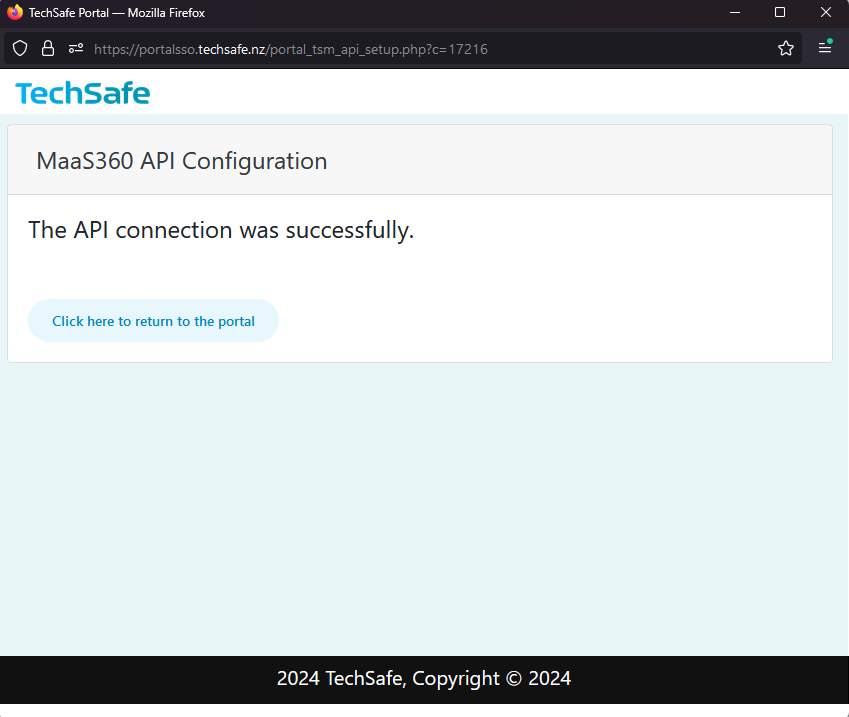
Click Submit and Test Access.
If successful, you will see the following screen.
You can then confirm the status by expanding the account details and seeing the green checkmark beside Manage Configuration Settings.